Installer programs for Windows
KCML, and related products, are installed on supported Windows versions using purpose made setup programs.
Initially the installer will extract files to a temporary directory. If the installer is being executed from a remote location, for example a web site such as the KCML Download area then this may take a some time while the files are transferred across the network connection. After the files have been extracted then the setup program is ready to install the product.
Installer options
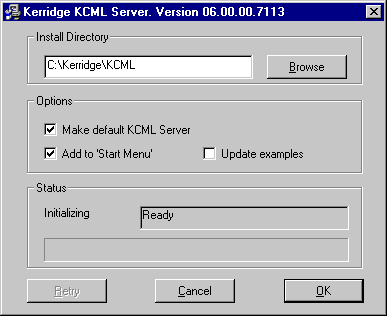
The Browse button will display a standard Windows file browser dialog. Use this to select an alternative directory to install into. Alternatively type in name of a directory into the Install Directory edit box. If a KCML product has not been installed before the install program will choose the default directory of C:/Program Files/ADP. If the install directory does not exist then it is created.
The first time a product is installed on a system it should be registered. This is controlled by the Make default product checkbox, which is turned on by default. If you do not need to register the product you can clear this checkbox. Certain KCML products require you to login as an Administrative user to install them, see Table 1
Some products can add entries to the Windows Start-Menu. Typical examples are helpfiles and the KCML client, KClient. This can be disabled by clearing the Add to 'Start Menu' checkbox.
If a product will install an example copy of a file, which may later be changed, then the installer will add an Update examples checkbox. Typical examples of files which are installed in this way are the kconf.xml configuration file and the Connection Manager's root directory, kwroot. These are installed with a .example suffix, ie kconf.xml.example and kwroot.example If kconf.xml or kwroot don't exist then they are created from their suffixed copies. If they already exist then they are left alone unless the Update examples has been checked. When this checkbox is clicked you can choose which files you which to overwrite.
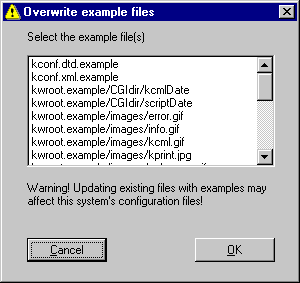
Great care should be excercised when using this option as any application or system specific configuration data will be lost. Files which are overwritten using this process are renamed with a .backup suffix. Press the OK button when you have selected the file(s) you which to overwrite.
Installation process
When you are ready to install click on the OK button on the main dialog. The installer will now do the following steps:
- Check there is enough free space on the target filesystem
- Check that the product is intended for the host operating system, see Table 1
- If the product is being installed on Windows NT4/2000/XP, check the user needs Administrative rights, see Table 1
- Check the installation directory exists, if not create it.
- Check that that a licence file exists if the product requires it, see Table 1
- Stop all KCML services to minimise the number of files that will be in use
- Install the files into the target directory. If the configuration file kconf.xml is installed, the setup program will automatically tune the settings it contains.
- Register the files, if the Make default product checkbox has not been cleared.
- Register the product with the Add/Remove Programs control panel applet, if the Make default product checkbox has not been cleared.
- Add shortcuts to the Start Menu if required.
- Restart any KCML services that were stopped
- Remove temporary directory and files.
In addition if the Remote licence daemon or the Connection Manager. were installed then the setup program will automatically create a service for these components. If the installer attempted to overwrite any file that was in use, it will display the error. The Retry button is then enabled. You then have the opportunity of leaving any application which may be using the file.
Table 1: Installed Products
| Product | Description | NT Administrative user | Licence file required |
|---|---|---|---|
| KCML Client | Unicode KCML client | Registration only | No |
| KCML Client 9x | ASCII KCML client | Registration only | No |
| KCML Server for NT | KCML server, Service Administrator and utilities | Always | Yes |
| ODBC Client | KCML Kisam ODBC Driver | Always | No |
| ODBC Server for NT | KCML Kisam ODBC Server and service administrator | Always | Yes |
| Direct ODBC | Combined ODBC Driver and server for Windows 95/98 | Always | Yes |
| KPLicServer | Remote Licence daemon for KPrint and KMail 3.0 | Always | Yes |
Command line switches
The behaviour of the installer programs can also be modified by using command line switches.| Switch | Purpose |
|---|---|
| -s or /s | Simple-upgrade. All options are disabled, installed programs are not registered and no Start-Menu shortcuts are added. Upgrade will continue when user presses the OK button. |
| -x | Don't register. The Make default product checkbox is disabled and the installed programs are not registered. |
| -f | Force a downgrade if the currently installed version is newer. |
| -i dir | Sets the install directory to dir |
| -j | Install for current user only (where supported). Does not require Administrator rights. |
| -m | Don't add shortcuts to the Start Menu |
| -u | Update. Error if a previous version has not been installed. Disable the Browse button and the Install Directory editbox. |
| -a | Auto-Upgrade. Same as the /s or -s option, except the installer will not wait for OK button to be pressed. |
| -p | Wait for all instances of the parent process to finish. The installer will only continue when all instances the parent process have terminated. |
| -? | Displays the list of supported command-line flags |
Use of these command line switches may be useful when running the installers programatically. For example:
The KCML client could be upgraded by $DECLARE'ing the WinExec() API. Note that the user must leave the application before proceeding with the installation.
Typical upgrade
$DECLARE 'WinExec(STR(),INT())
upgrade_cmd$ = tmpdir$ & "setup /s"
'WinExec(upgrade_cmd$, 1)
In this example, the installer will be invoked with the /s flag. It will only continue when the OK button has been pressed. This gives the user a chance to logout before proceeding with the upgrade.
A fully-automatic upgrade can be acheived by using the -a and -p flags:
$DECLARE 'WinExec(STR(),INT())
PRINT "Upgrading KClient ..."
upgrade_cmd$ = tmpdir$ & "setup -a -p"
'WinExec(upgrade_cmd$, 1)
REM Close and files before terminating
'CloseAllFiles()
REM Terminate so that KClient is no longer in use
$END
Here the KCML program launches the KClient installer and then exits, making sure that all resources have been released. The install program will wait for any instances of the parent process (-p flag), kclient.exe, to terminate before proceeding with the upgrade. Once all instances of the parent process, have finished, the installation will continue without any user interaction, (-a flag).